 Mar 18, 2026
 How to Generate Multiple Angles of the Same Jewelry Design
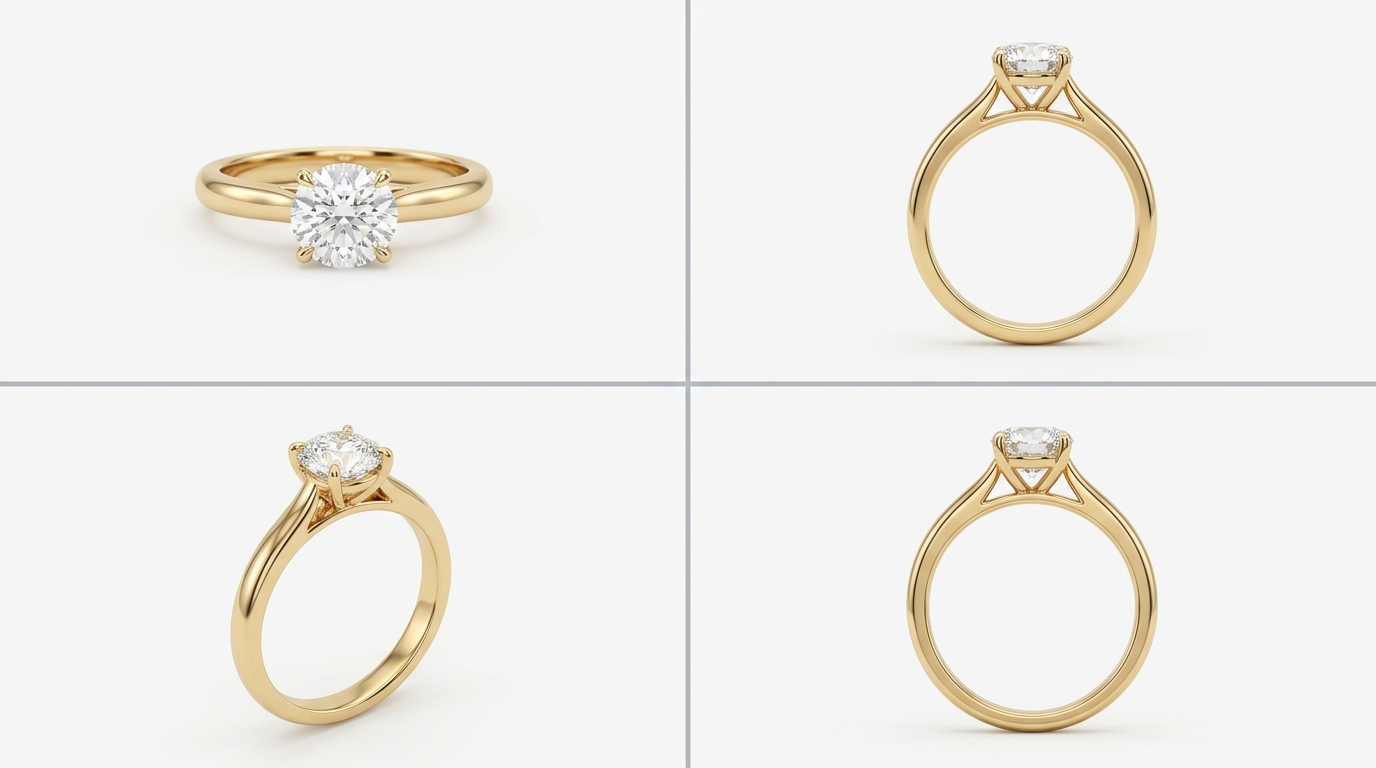
A single render of a jewelry piece is rarely enough. A ring photographed straight-on tells you almost nothing about the band profile, the side stone arrangement, or how the setting sits. A pendant shot from the front hides the bail detail and the depth of the design. Buyers, clients, and product pages all need multiple views, and generating them used to mean either running a new prompt from scratch and hoping for consistency, or booking a photographer with a physical sample. Studio's Multiple Angles tool is built specifically to solve this.
How the Multiple Angles Tool Works
Find Multiple Angles in the Design menu inside any project. Select the design image you want to re-render, open the tool, and you'll see two sliders alongside a preview of your current image.
The first slider controls azimuth, the horizontal rotation around the piece, running from 0 to 360 degrees. Named positions at Front, Back, Left, and Right snap to the standard product photography angles so you don't have to eyeball it.
The second slider controls elevation, the vertical camera angle, running from minus 30 to 90 degrees. Eye-level and Top are the named snap positions. Eye-level gives you the natural wearing perspective. Top gives you a looking-down view that's particularly useful for rings and brooches where the face of the piece is the whole story.
Set the sliders, hit Generate, and Studio produces a new variation of your design from that viewpoint. The aesthetic stays consistent with the original because the AI is re-rendering the same design rather than generating something new from a text description.
Why Consistency Matters Here
The whole value of this tool is that the output looks like the same piece from a different angle, not like a different piece that happens to resemble the original. That consistency is what makes multiple angle renders actually usable for a catalog or a product page.
If you've tried getting multiple angles out of a general-purpose AI tool by rerunning a text prompt, you know the problem. The stone shape shifts slightly. The band proportions change. The metal color reads differently. You end up with images that are broadly similar but not consistent enough to present together as a single product.
Multiple Angles avoids this because the original design image is the anchor, not the text prompt.
Building a Complete Product View Set
A practical workflow for catalog-ready multi-angle coverage:
Start with your hero render, usually a three-quarter front view that shows the design at its most characteristic angle. Run Multiple Angles to get a straight front view, a side profile, and a top-down view. For rings, add a slight elevation angle showing the setting height. For pendants, add a three-quarter view from the other side to show the bail.
Four to five images per design gives you full coverage for most product page requirements. For pieces with significant back detail — like a ring with side stones or a necklace with a decorative clasp — add a back view too.
Once you have the full angle set, add all of them to the project as variations, then build them into your catalog together. When you export a presentation deck or a catalog PDF, each slide can include the multi-angle set rather than a single image, which tells a much more complete story to a buyer.
Using Angle Presets for Consistency Across a Collection
If you're building a full collection where every piece needs the same angle coverage, the named snap positions (Front, Side, Eye-level, Top) are your friend. Using the same named positions across every design in the collection means the angles are consistent enough to be comparable in a catalog layout, which looks professional and helps buyers assess the collection as a whole rather than as a set of individual images.
For teams generating at volume, this can be incorporated into the Agent Mode brief. Specify the angle set you need as part of the generation instructions and the agent handles the multi-angle output as part of the batch.
The Pose Tool for Reference-Guided Angles
There's a related tool worth knowing about called Pose/Angle, also in the Design menu. Where Multiple Angles works from sliders, Pose lets you supply a reference image to guide the camera position. If you have a photograph of a similar piece at exactly the angle you want, upload it as the angle reference and the AI will try to match that viewpoint.
This is useful when the standard named angles don't quite match what you need, or when you're trying to match the angle conventions of an existing catalog where pieces are always shot at a specific consistent viewpoint that doesn't map neatly to Front or Three-Quarter.
Recent Posts
Jewelry Price Book: How to Set Org-Wide Gem Rates and Match Diamond Inventory
Studio's Price Book lets admins set org-wide gem rates once, feeding every AI pricing estimate automatically, while the Diamond Inventory Matcher checks stock against a design's specs before you quote a client.
AI Gemstone Jewelry Design: How to Generate Sapphire, Ruby, and Emerald Pieces That Look Real
Colored gemstones render very differently than diamonds. Here's the specific prompting, spec-locking, and pricing workflow for getting sapphire, ruby, emerald, and pearl jewelry to look convincing in Diatech Studio.
AI Jewelry Design Draft Quality: How to Iterate Faster Without Wasting Credits
Studio's Auto tool now has a Draft quality tier for AI jewelry design, a faster, lower-cost setting built for early concept exploration before you commit credits to a polished render.