 May 2, 2026
 How to Turn a Hand-Drawn Jewelry Sketch Into a Polished AI Render
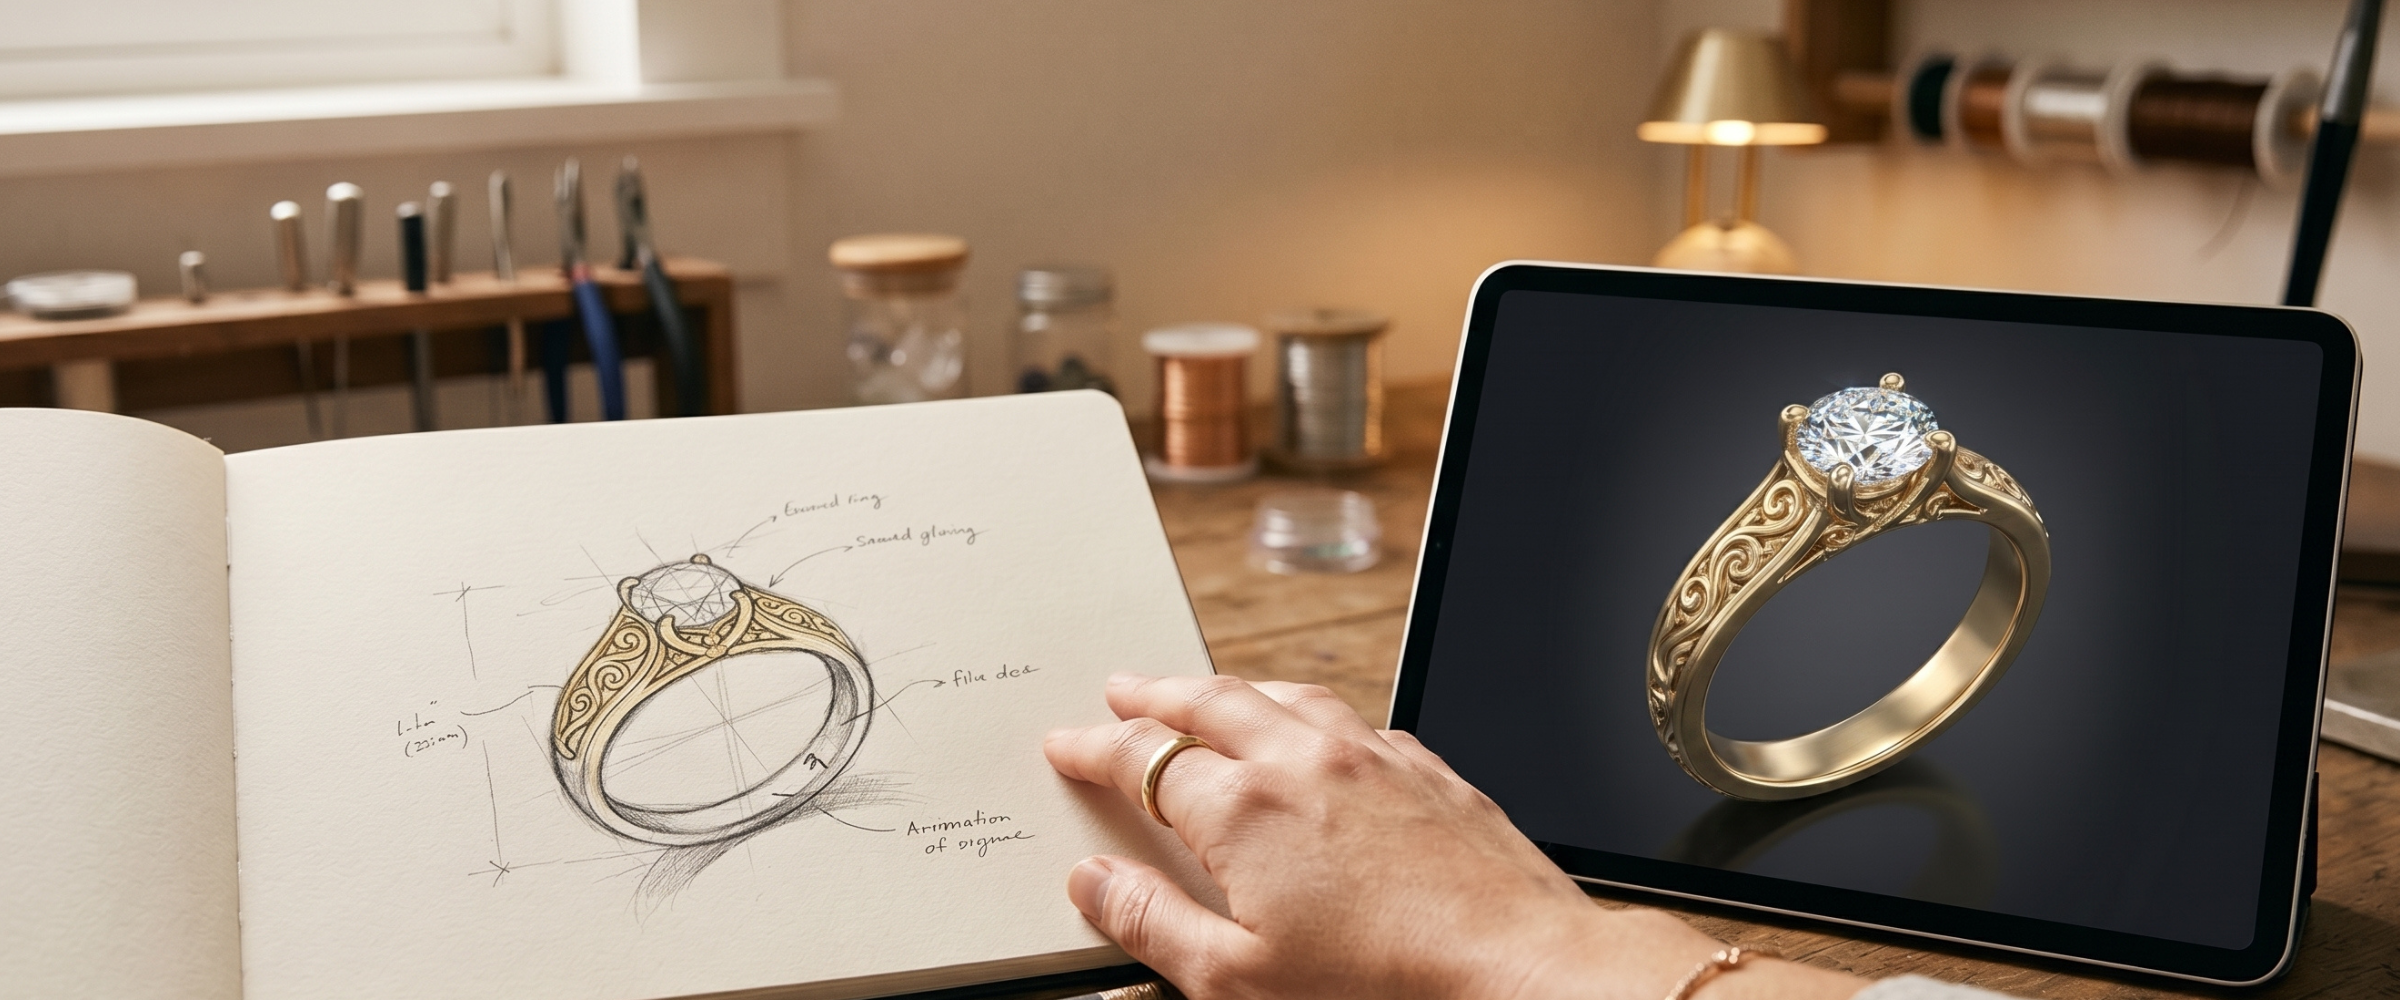
The sketch still matters. For most jewelry designers, the first instinct when a new idea arrives is to reach for a pencil — not a keyboard. Notebooks filled with ring profiles, pendant silhouettes, and stone arrangements: that's where real design thinking happens. The problem has always been transferring those hand-drawn concepts into something you can actually show a client or send to production.
Diatech Studio's sketch upload workflow handles this directly. You photograph your sketch, upload it as a starting point, and the AI interprets and renders it as a polished design image. No redrawing, no vectorizing, no translating your shorthand into a formal brief. Here's how it actually works — and what separates a useful sketch input from one that produces underwhelming results.
What the AI does with your sketch
When you upload a sketch, Studio isn't tracing lines or converting them to a vector. It reads the sketch as visual intent — the overall silhouette, proportions, the relationship between parts, and whatever detail you've indicated — then generates a photorealistic render that captures the same idea at higher fidelity.
That distinction matters for how you prepare your sketch. The AI is working from the visual language of jewelry form: the proportion of a shank relative to a head, the implied thickness of a band, the way a setting is suggested by a cluster of quick lines. You don't need to draw every prong perfectly. But you do need the sketch to communicate the right things clearly.
What makes a sketch work well for AI input
Silhouette clarity is the single most important factor. If the overall shape of the piece reads clearly — a solitaire with a thin band, a wide cuff with a central motif — the AI can fill in convincing detail. Where results get muddy is when the outline is ambiguous: is this a top view or three-quarter? Is this a hoop earring or an open bangle? A few lines of shading or a quick note of the viewing angle can resolve this.
Proportion matters more than finish. A rough sketch with correct stone-to-setting-to-band proportions produces better results than a beautifully drawn piece where the proportions are off. The AI tries to reproduce what it sees.
Written annotations help. A few words directly on the sketch — "yellow gold," "oval 2ct," "pave band" — get factored into the render. This is especially useful when your drawing doesn't convey material or finish by itself. Think of it as a brief attached to the visual.
Clean backgrounds make a real difference. Photograph your sketch on plain white or a light surface, in good light, without other objects in frame. Dark or textured backgrounds introduce noise that can bleed into the output in unexpected ways.
How to upload a sketch in Studio
On the new project screen, tap or click the Sketch chip — one of four quick-start options at the top of the screen, alongside Design, Reference, and CAD. This opens the sketch upload input directly.
Upload your photo. Studio creates a new project, analyzes the sketch, and generates an initial render as your first design variation. From that point, you're in the normal project workspace.
That first result won't always be exactly right, and that's fine. Think of it as an informed starting point rather than a finished render.
Refining from the initial render
The real value of the jewelry design from sketch workflow shows up in the iteration phase. Once you have that first render, the full editing toolkit is available:
Use the prompt bar to add what's missing. Type in whatever the sketch didn't convey fully. "Narrow the band," "add micro-pavé along the shank," "change the stone to a marquise cut" — these layer on top of what the sketch established. You're not starting over; you're correcting course.
Use Targeted Edit for specific areas. Draw a lasso around just the stone setting, just the band, or any single element if the rest of the design is correct but one part needs changing. This isolates the edit so the rest of the render isn't touched.
Use Variation to explore alternatives. If the first render captures the right spirit but you want to see a few different interpretations, Variation generates new versions that preserve the character of the design while introducing creative differences. The Similarity control (Low through Very High) lets you decide how closely each variation tracks the original.
Paste the sketch back in as a reference. If subsequent prompt-based edits drift from your original intent, paste the sketch photo into the AI Chat view as a reference image. This re-anchors the AI to your starting design and tends to pull the output back toward the original concept.
What to do when the sketch is too rough
Some sketches are working notes rather than design documents — quick thumbnails, overlapping lines, proportional experiments. If the first render doesn't match your intent at all, a couple of approaches work better than re-uploading the same sketch unchanged.
Spend five minutes cleaning the sketch before the next attempt: trace the key lines more clearly, erase the noise, add a few written notes, and re-photograph. That small effort often produces a dramatically better output.
Alternatively, bypass the sketch for the initial generation and use a text prompt to establish the concept first. Once you have a render that captures the basic idea, upload the sketch as a reference in a follow-up edit to constrain the AI toward your drawn version. Sometimes describing a design clearly in words first gives you a better base to work from.
Taking the render further
Once you've iterated to a version that matches your intent, the sketch has done its job. You're working with a project containing one or more polished renders, and the normal Studio workflow applies: share with a client via a token link, annotate for review, add to a catalog, generate product images and videos, or continue refining with tools like Multiple Angles to produce views from different camera positions.
The sketch itself doesn't need to disappear — you can upload it as a variation in the project so your original intent stays visible alongside the AI renders. It's useful context for anyone else reviewing the design later, and it shows the client where the idea came from.
What this workflow removes is the friction between a designer's physical sketchbook and the digital tools needed to move a project forward. The idea doesn't have to wait for someone to redraw it properly or write a detailed brief from scratch. It goes from paper to client-ready render in the same session — and the designer stays in control of what the AI is working toward.
Recent Posts
Lab-Grown Diamond Jewelry Design: How to Generate, Specify, and Price LGD Pieces
Lab-grown diamonds now account for a significant share of jewelry sales, but the workflow for designing, specifying, and pricing LGD pieces with AI has never been well-documented. Here's the full cycle in Diatech Studio — from generating renders to setting up LGD rates in your Price Book and checking inventory before you quote.
Jewelry Video Background Removal: How to Turn Any Product Clip Into a Scene-Ready Asset
Most jewelry product videos have their background baked in from the start — making them hard to reuse across different website themes, ad templates, and social formats. Studio's Matte Video tool strips any jewelry video background in one step, giving you clean isolated footage you can drop into any scene without a video editor.
Jewelry Product Videos With Audio: How to Go From Still Image to Social-Ready Clip in One Step
Most jewelers use multiple tools to get a scored, ready-to-post product video. Studio's Videography tool lets you pick duration and audio together in one submission — no separate music step, no timeline editing. Here's how to use it and where it fits into a practical jewelry marketing workflow.